

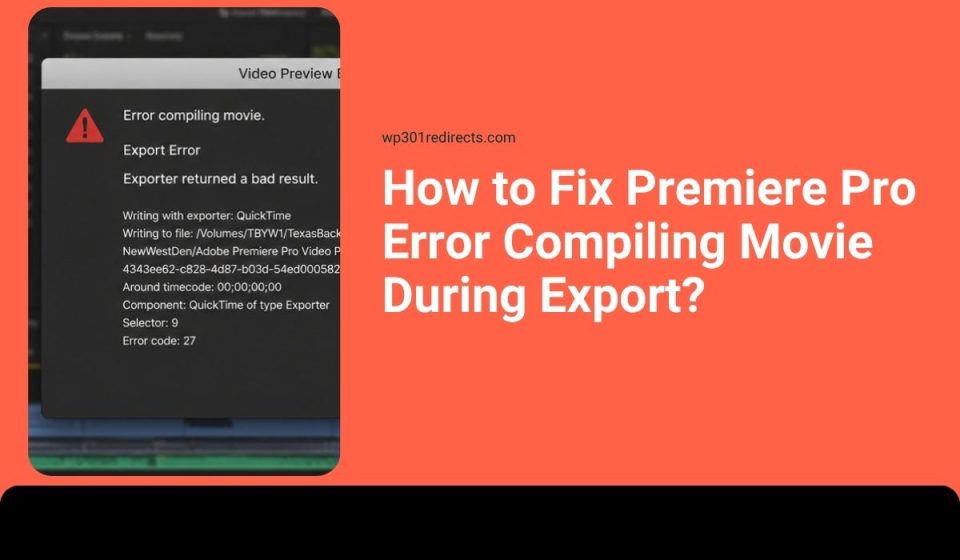
You finish editing your video, click export, and then Premiere Pro throws the error compiling movie message. Very annoying. It always seems to happen when you think the project is finally done. This error can stop export, render, preview files, or even Adobe Media Encoder output. The good thing is that your project is usually not destroyed. Premiere Pro is just stuck on one clip, effect, setting, cache file, or system issue.
What Does Premiere Pro Error Compiling Movie Mean?
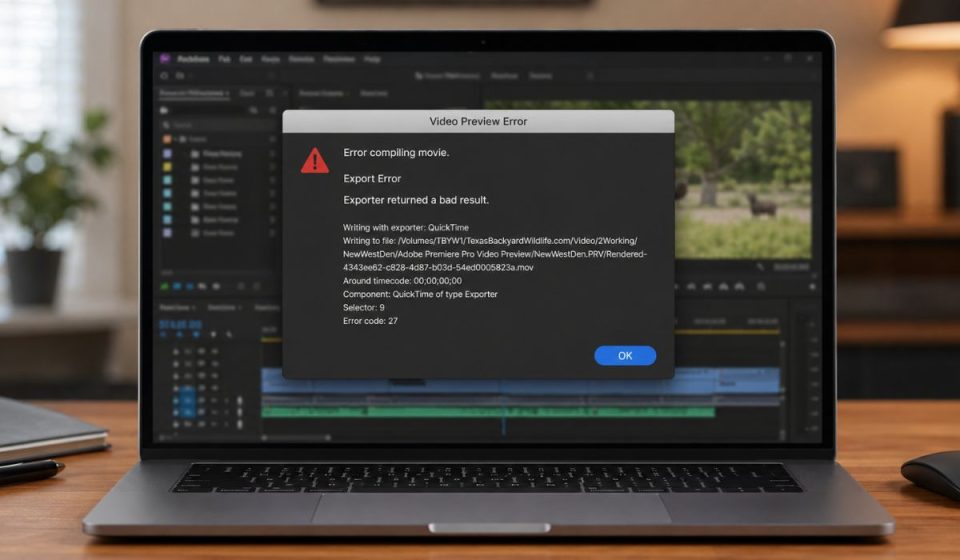
Premiere Pro error compiling movie means Adobe Premiere Pro cannot finish building your final video from the timeline. It may happen while exporting, rendering In to Out, making preview files, or sending the sequence to Adobe Media Encoder. Sometimes Premiere hits a bad clip, heavy effect, broken media cache, GPU render issue, codec problem, or storage problem. So instead of making the final MP4 or MOV file, it stops and shows the error. Kind of rude, honestly, but at least it gives you a clue that something in the project needs checking.
You may see this message in the Export window, timeline render, preview render, or Adobe Media Encoder queue. Sometimes it also shows a timecode, error code, selector number, or just a boring “unknown error.”
Common Causes of Premiere Pro Error Compiling Movie
This error usually happens when Premiere Pro reaches something in the timeline or export setup that it cannot process. And yeah, one tiny bad frame can stop a full video export.
- A corrupted clip, odd media file, or damaged frame can stop export at one timecode.
- Heavy effects like Lumetri Color, Warp Stabilizer, noise reduction, or third-party plugins can break rendering.
- GPU acceleration can fail when the graphics driver or renderer does not handle the sequence well.
- Old media cache or broken preview files can confuse Premiere Pro during export.
- Unsupported codecs, variable frame rate footage, or mixed frame rates can cause encoding issues.
- Export settings like H.264 preset, hardware encoding, bitrate, or frame size may not fit the project well.
- Low disk space or bad scratch disk settings can stop Premiere from writing the final file.
How to Fix Premiere Pro Error Compiling Movie?
Start with easy fixes first. A lot of export errors come from one timeline item, a cache issue, or a GPU setting. But don’t change ten things at once. Test the export after each fix so you know what actually worked.
Fix #1: Restart Premiere Pro and Your Computer
Premiere Pro can get stuck during rendering because of memory, GPU, or background process issues. Save your project, close Premiere Pro, restart your computer, open the project again, and try the export one more time. This sounds too simple, I know. But it can clear stuck render sessions, temporary files, and small system glitches that block export.
Fix #2: Check the Error Timecode and Problem Clip
If the error message shows a timecode, go straight to that part of the timeline. The problem may be near that exact spot. Check the clip, transition, adjustment layer, effect, title, caption, or audio file around that area. Adobe users often find that one odd item in the timeline causes the whole export to fail. And yes, it is weird that one small clip can ruin the full render.
Fix #3: Render or Export the Project in Small Sections
Exporting in small parts helps you find the broken timeline area. If one section exports fine and the next section fails, the failed part probably has the bad clip, effect, transition, or media file. This is not fancy editing work. It is just a smart way to trap the problem.
Follow the steps below to test your Premiere Pro timeline in smaller parts.
- Save a copy of your Premiere Pro project.
- Set In and Out points around the first half of the timeline.
- Export only that section.
- If it works, test the second half.
- Keep narrowing the failed section.
- Check clips, effects, and transitions near the failed spot.
- Replace or remove the problem item.
- Export the full video again.
If one small section keeps failing, focus there. Don’t waste time changing the whole project if only one clip or effect is causing the error.
Fix #4: Clear Media Cache and Delete Old Preview Files
Premiere Pro stores media cache and preview files to make playback and editing smoother. But sometimes those files get old, broken, or mixed up with previous project data. Clearing cache does not delete your original clips or timeline. It only removes temporary files that Premiere Pro can rebuild later. Cache problems are boring, but they cause some very annoying export errors.
Try these simple steps to clear old Premiere Pro cache files.
- Open Premiere Pro.
- Go to Edit on Windows or Premiere Pro on Mac.
- Open Preferences.
- Select Media Cache.
- Click Delete beside media cache files.
- Choose to remove unused media cache files.
- Restart Premiere Pro.
- Export the project again.
If the export works after clearing cache, the problem was probably old temporary data. Not your edit. Just Premiere holding onto messy background stuff.
Fix #5: Switch Renderer to Software Only
GPU acceleration makes rendering faster, but sometimes it also causes error compiling movie. This can happen with effects, color grading, transitions, old GPU drivers, or heavy timelines. Switching to Software Only is slower, but it can be more stable. Not the fastest way, but sometimes the safe way is the way to go.
The following steps will show you how to test the Software Only renderer.
- Open your Premiere Pro project.
- Go to File.
- Select Project Settings.
- Click General.
- Find Renderer.
- Change it to Mercury Playback Engine Software Only.
- Click OK.
- Restart Premiere Pro if needed.
- Export the video again.
If this fixes the issue, your GPU renderer or graphics driver may be part of the problem. Later, you can update your NVIDIA, AMD, or Intel graphics driver and test GPU acceleration again.
Fix #6: Change Export Format or Encoding Settings
Sometimes the project is fine, but the export settings are not playing nice. H.264 is common for YouTube, websites, and normal online video, but hardware encoding, bitrate, frame size, or a custom preset can still fail. And yeah, export settings can look okayish but still cause problems.
You can perform the following steps to test safer export settings.
- Open the Export window.
- Choose H.264 as the format for normal online video.
- Pick a built-in preset instead of a custom one.
- Turn off Hardware Encoding if it keeps failing.
- Try Software Encoding.
- Lower the bitrate slightly if the export file is huge.
- Choose a drive with enough free space.
- Export again.
If Software Encoding works, keep using it for this project. It may take longer, but a finished export is better than a fast failed export.
Fix #7: Replace or Convert Problem Media
Some media files are hard for Premiere Pro to export. Phone videos, screen recordings, variable frame rate clips, damaged files, or unsupported codecs can break the render. A clip may play fine in a video player but still fail inside Premiere Pro. That feels unfair, but editing apps read files in a stricter way.
Perform the following steps carefully to replace or convert the problem media.
- Find the clip near the failed timecode.
- Open it in a video player.
- Check if the file glitches, freezes, or skips.
- Convert the file to a constant frame rate format.
- Use ProRes, DNxHR, or H.264 MP4 if suitable.
- Replace the clip in Premiere Pro.
- Reapply needed edits if required.
- Export the sequence again.
If the converted file exports fine, the original media was probably the issue. For future projects, convert phone footage and screen recordings before editing when they act weird.
Fix #8: Check Disk Space, Scratch Disks, and File Permissions
Premiere Pro needs free storage to write export files, preview files, cache files, and temporary render data. If your export drive is full or the folder is locked, export can fail near the end. That one hurts, because you wait so long and then get nothing. Also avoid exporting directly into a cloud-only folder because sync apps can mess with the file while Premiere is writing it.
These are the exact steps you need to follow to check storage and permissions.
- Check free space on the export drive.
- Check free space on the system drive.
- Open File.
- Go to Project Settings.
- Select Scratch Disks.
- Choose a drive with enough space.
- Make sure the export folder is not locked.
- Avoid exporting directly to a cloud-only folder.
- Try exporting to a local desktop folder.
If the export works on a local folder, your old export location may have been blocked, full, or busy with cloud sync. Keep it simple when you are troubleshooting.
Prevention Tips to Avoid Premiere Pro Compiling Errors
Preventing this error is mostly about keeping your timeline clean and your export setup stable. You don’t need some super expensive editing machine for every project. Just keep media, cache, drivers, and storage in decent shape. Small habits save you from big export headaches.
- Keep Premiere Pro and GPU drivers updated.
- Use stable media formats when possible.
- Convert variable frame rate phone or screen recordings before editing.
- Keep enough free space on export and cache drives.
- Avoid stacking too many heavy effects on one clip.
- Clear old media cache when projects start acting weird.
- Save project copies before major edits or plugin changes.
Conclusion
In short, Premiere Pro error compiling movie means Premiere Pro cannot finish rendering or exporting your sequence. The issue may come from a bad clip, timeline effect, GPU renderer, media cache, export preset, codec, scratch disk, or storage problem. Most of the time, the project is not ruined. Premiere just needs you to find the clip or setting that blocks the export. Annoying, yes, but usually fixable.
Start with restart, timecode checking, and section export tests. If that does not work, clear cache, change the renderer, adjust export settings, or replace the problem media. If this guide helped, share it with another editor or leave a comment with the exact Premiere Pro error message you saw.