

Going live without a starting screen can feel messy. Viewers join and see you adjusting your mic or fixing your layout. That does not look good. A Starting Soon screen in OBS Studio gives you time to prepare while your audience gathers. In this guide, you will learn what a Starting Soon screen is, why streamers use it, how to create one step by step, and how to switch smoothly into your live scene.
What Is a Starting Soon Screen in OBS Studio?
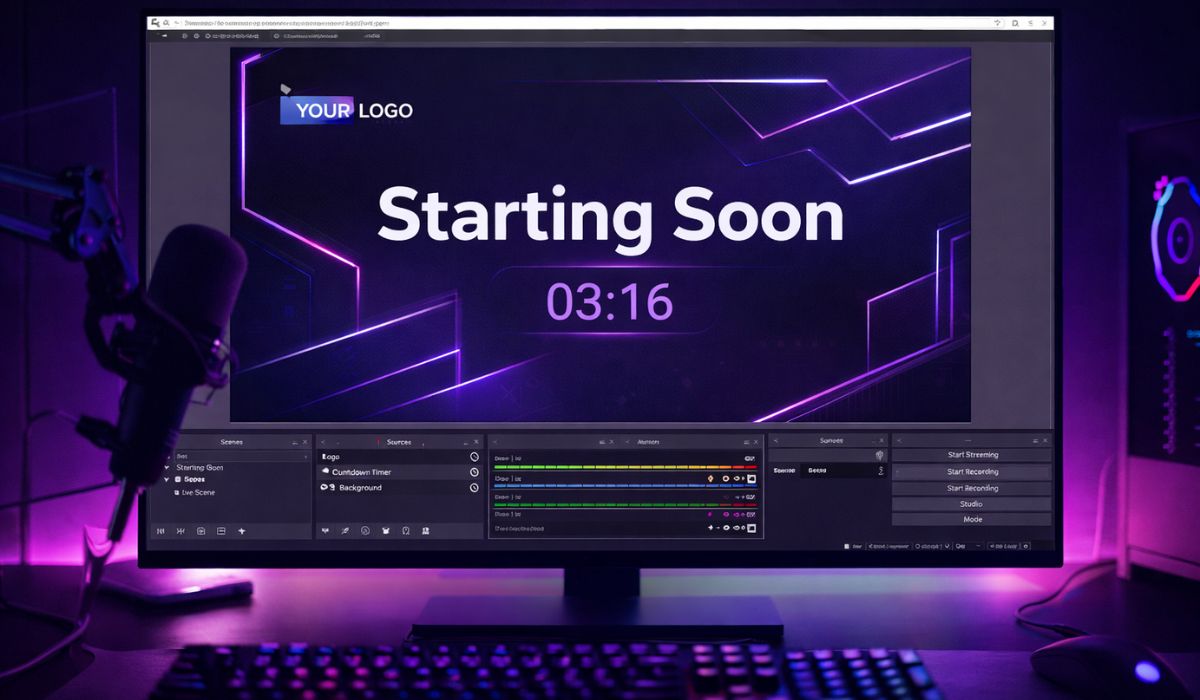

A Starting Soon screen is a pre-stream scene shown before your live content begins. In OBS Studio, it is simply a separate Scene that contains an image, video background, text like “Starting Soon,” and sometimes a countdown timer or background music.
Streamers on Twitch, YouTube Live, Facebook Live, and Kick use it to create a professional introduction.
Instead of showing a blank screen or setup mistakes, the audience sees a clean overlay with branding elements. OBS Studio handles this using Scenes and Sources, where each Scene acts like a layout container and each Source adds visual or audio content.
The Starting Soon scene works independently from your main gameplay or webcam scene.
You normally display this screen right after clicking Start Streaming in OBS Studio. It appears before switching to your main live scene. You control it manually by changing Scenes inside OBS.
Why Streamers Use a Starting Soon Screen
A Starting Soon screen helps streamers stay organized and calm before going live. It gives viewers time to join the stream notification. It allows you to check microphone levels in the Audio Mixer. It prevents showing private windows or desktop mistakes. It also builds branding when you add logos, colors, and social media handles. Even small channels benefit because presentation matters.
How to Create a Starting Soon Scene in OBS
Before adding text or timers, you first need a dedicated Scene. OBS Studio separates layouts using Scenes. Each Scene contains multiple Sources like images, video files, browser overlays, and audio tracks. Therefore, creating a new Scene is the first step.
Step 1: Create a New Scene
Follow these easy instructions to create a new scene without confusion.
- Open OBS Studio.
- In the Scenes panel, click the plus icon.
- Name the scene “Starting Soon.”
- Click OK to confirm.
- Make sure the new scene is selected.
Now you have a blank layout ready for customization.
Step 2: Add a Background Image or Video
Your Starting Soon screen needs a background. This can be a static image or an animated loop.
Follow the steps below to easily add a background.
- In the Sources panel, click the plus icon.
- Select Image if you have a PNG or JPG file.
- Select Media Source if you have an MP4 animation.
- Browse and choose your file.
- If using video, enable Loop.
- Click OK.
The background now fills your canvas. You can resize or adjust it using the preview window.
Step 3: Add “Starting Soon” Text
Text tells viewers what is happening. OBS includes a built-in text tool.
You can perform the following steps to add text properly.
- Click the plus icon in Sources.
- Choose Text (GDI+) on Windows or Text on macOS.
- Name it Starting Soon Text.
- Type “Starting Soon” in the text field.
- Choose your font, size, and color.
- Position the text on the screen.
Clear and bold fonts improve visibility.
Step 4: Add a Countdown Timer
A countdown timer builds anticipation. Viewers know exactly when you will begin.
You have two options.
Option A – Use a Browser Source
Follow these simple steps to quickly add an online timer.
- Click the plus icon in Sources.
- Select Browser Source.
- Paste a countdown timer URL from a trusted timer website.
- Adjust width and height settings.
- Click OK and position it on the screen.
Option B – Use a Video Countdown File
If you have a pre-made countdown video, add it as a Media Source and enable Loop if needed.
Step 5: Add Background Music
Soft music makes your Starting Soon screen more engaging. However, avoid copyrighted tracks unless you have permission.
The following steps will show you how to add music properly.
- Click the plus icon in Sources.
- Select Media Source.
- Choose your audio file.
- Enable Loop if needed.
- Adjust volume in the Audio Mixer.
Keep audio levels balanced so the music does not overpower your microphone.
How to Switch Between Starting Soon and Live Scene
Switching Scenes in OBS Studio is simple but important. Once you finish preparing, you move from the Starting Soon scene to your main live scene that contains your webcam, gameplay capture, or screen capture. OBS allows manual switching by clicking on different Scenes.
You can also use Studio Mode to preview changes before showing them live. Studio Mode displays a Preview window and a Program window, which helps avoid sudden visual changes. You may even assign Hotkeys inside OBS settings to switch scenes quickly during live broadcasts.
Always test your scene transition before streaming publicly. A quick private stream test on YouTube Live or Twitch helps confirm everything works smoothly.
Tips to Make Your Starting Soon Screen Look Professional
Small design choices improve presentation and viewer experience.
- Keep your layout clean and not overcrowded
- Use brand colors that match your logo
- Add your Twitch or YouTube username clearly
- Keep the countdown timer readable
- Use smooth Fade or Cut transitions
- Balance music and microphone levels
Simple designs often look better than complex ones.
Conclusion
In short, adding a Starting Soon screen in OBS Studio is simple. You create a new Scene, add a background image or video, insert text, include a countdown timer, and optionally add music. Scenes and Sources work together to build your layout. With proper switching and testing, your stream begins in a professional way.
If this guide helped you set up your OBS Studio starting screen, share it with other streamers. And if you stream on Twitch, YouTube Live, or Kick, comment below and tell us which platform you use.